How to Replace Brake Pads is one of the most useful car maintenance skills you can learn. It saves money, improves safety, and gives you confidence in handling your vehicle. Whether you’re new to DIY car care or just want to avoid expensive mechanic fees, this beginner-friendly guide will walk you through everything step by step.
Learning simple automotive skills is similar to building an online business — the more knowledge you gain, the more passive income-like savings you generate over time. Let’s dive into the complete process.
Why Replacing Brake Pads Is Important
Your brake pads are essential for stopping your car safely. Over time, they wear down due to friction. Ignoring worn brake pads can lead to:
- Reduced braking performance
- Damage to rotors (expensive to fix)
- Increased stopping distance
- Safety risks on the road
Replacing brake pads at the right time ensures your car remains safe and efficient.
Signs You Need to Replace Brake Pads
Before learning how to replace brake pads, you need to know when it’s time to change them. Look out for these signs:
- Squeaking or squealing noise when braking
- Grinding sound (severe wear)
- Brake warning light on dashboard
- Vibration when braking
- Brake pads less than 3mm thick
Regular inspection helps prevent costly repairs later.
Tools and Materials You’ll Need
Before starting, gather the following tools:
- Jack and jack stands
- Lug wrench
- Socket set
- C-clamp or brake caliper tool
- New brake pads
- Brake cleaner
- Gloves and safety glasses
You can find quality tools and parts at trusted retailers like AutoZone or Amazon.
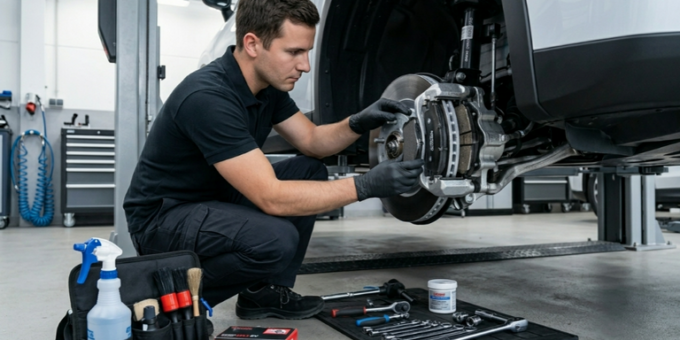
Step-by-Step Guide: How to Replace Brake Pads
Step 1: Prepare Your Vehicle
Park your car on a flat surface and engage the parking brake. Loosen the lug nuts slightly before lifting the vehicle.
Step 2: Lift the Car Safely
Use a jack to lift the car and secure it with jack stands. Safety is critical — never rely on the jack alone.
Step 3: Remove the Wheel
Fully remove the lug nuts and take off the wheel to access the brake assembly.
Step 4: Remove the Brake Caliper
Locate the brake caliper and remove the bolts using a socket wrench. Carefully slide the caliper off the rotor.
Do not let it hang by the brake hose. Use a hook or rope to secure it.
Step 5: Remove Old Brake Pads
Slide out the worn brake pads from the caliper bracket. Take note of their position for proper installation of new pads.
Step 6: Compress the Caliper Piston
Use a C-clamp to push the caliper piston back into its housing. This step is necessary to fit the new, thicker brake pads.
Step 7: Install New Brake Pads
Place the new brake pads into the bracket. Ensure they are aligned properly.
Step 8: Reinstall the Caliper
Slide the caliper back over the new pads and tighten the bolts securely.
Step 9: Reattach the Wheel
Put the wheel back on and hand-tighten the lug nuts.
Step 10: Lower the Car and Test
Lower the vehicle and fully tighten the lug nuts. Pump the brake pedal several times before driving to ensure proper pressure.
Common Mistakes to Avoid
Even beginners can successfully learn how to replace brake pads, but avoid these common mistakes:
- Skipping safety steps (jack stands)
- Not compressing the piston fully
- Installing pads incorrectly
- Forgetting to pump brakes before driving
How Much Money Can You Save?
Replacing brake pads yourself can save $100–$300 per axle. This is similar to how affiliate marketing or a dropshipping business helps reduce overhead costs — you keep more money in your pocket.
DIY car maintenance is a practical way to reduce expenses without sacrificing quality.
How Often Should You Replace Brake Pads?
Most brake pads last between 30,000 to 70,000 miles. However, this depends on:
- Driving habits
- Road conditions
- Type of brake pads
Check your owner’s manual or visit Consumer Reports for more guidance.
DIY vs Professional Replacement
DIY Advantages
- Lower cost
- Learn valuable skills
- Work at your own pace
Professional Service
- Convenient
- Warranty on work
- Expert inspection
If you’re comfortable with tools, DIY is a great option.
Safety Tips for Beginners
- Always wear protective gear
- Work on a level surface
- Double-check all bolts and parts
- Test brakes before driving at high speed
Final Thoughts
Now you know exactly how to replace brake pads step by step. It’s a simple yet powerful skill that saves money and improves your vehicle’s safety.
Just like building an online business, mastering small tasks leads to long-term rewards. Whether it’s fixing your car or exploring opportunities like affiliate vs dropshipping, the key is taking action and learning consistently.
Start with this DIY project, and you’ll gain confidence for even more advanced car maintenance tasks.